前言 今年的 React conf 主要介绍了即将推出的 React 19 的诸多新特性,演讲视频合集可以看https://conf.react.dev/talks ,目前 React 19 已经正式进入到了 RC 阶段,意味着其离正式发布为期不远矣,笔者整理了演讲中的诸多内容,并根据自身实践和经验对 React 19 的新特性进行了梳理。
新的 hook 和 API 预加载相关 React 19 提供了一组用于资源预加载的 API,包括 prefetchDNS, preconnect, preload, preinit 等等。
1
2
3
4
5
6
7
8
import { prefetchDNS, preconnect, preload, preinit } from 'react-dom' function MyComponent ( preinit ('https://.../path/to/some/script.js' , {as : 'script' }) preload ('https://.../path/to/font.woff' , { as : 'font' }) preload ('https://.../path/to/stylesheet.css' , { as : 'style' }) prefetchDNS ('https://...' ) preconnect ('https://...' ) }
其本质是对使用 link 元素进行预加载能力的封装,上述代码最终会生成下面的 html 结构:
1
2
3
4
5
6
7
8
9
10
11
12
13
<!-- the above would result in the following DOM /HTML --> <html> <head> <link rel="prefetch-dns" href="https://..."> <link rel="preconnect" href="https://..."> <link rel="preload" as="font" href="https://.../path/to/font.woff"> <link rel="preload" as="style" href="https://.../path/to/stylesheet.css"> <script async="" src="https://.../path/to/some/script.js"></script> </head> <body> ... </body> </html>
useActionState useActionState 是一个新的 hook, 主要解决表单状态管理的问题,可以大量减少我们的冗余代码,并提供更好的代码抽象能力,比如:
1
2
3
4
5
6
7
8
9
10
11
12
13
14
15
16
17
18
19
20
21
22
23
24
25
26
27
28
29
30
31
32
33
import { useState } from 'react' ;const Demo = function ( const [title, setTitle] = useState ('' ); const [subtitle, setSubtitle] = useState ('' ); function onTitleChange (newVal ) { setTitle (newVal); } function onSubtitleChange (newVal ) { setSubtitle (newVal); } function handleSubmit ( fetch ('https://update-info' , {title, subtitle}).then (res =>json ()).then (res => setTitle (res.modifiedTitle ); setSubtitle (res.modifiedSubtitle ); }) } return ( <form > {title} {subtitle} <input name ="title" onChange ={onTitleChange} /> <input name ="subtitle" onChange ={onSubTitleChange} /> <button onClick ={handleSubmit} > 提交</button > </form > ) }
有了 useActionState 之后,我们可以这样来写代码:
1
2
3
4
5
6
7
8
9
10
11
12
13
14
15
16
17
18
19
20
21
22
23
24
25
26
27
28
import { useActionState } from 'react' ;async function submitAction (prevState, queryData ) { const title = queryData.get ('title' ); const subtitle = queryData.get ('subtitle' ); const res = await fetch ('https://update-info' , {title, subtitle}).then (res =>json ()); return { title : res.modifiedTitle , subtitle : res.modifiedSubtitle } } const Demo = function ( const [state, action] = useActionState (submitAction, { title : '' , subtitle : '' }); return ( <form action ={action} > {state.title} {state.subtitle} <input name ="title" /> <input name ="subtitle" /> <button type ="submit" > 提交</button > </form > ) }
可以看出 useActionState 帮我们节省了大量的代码,当表单触发提交时会自动执行 submitAction 方法,而 submitAction 也支持了 promise 调用,并且内部可以直接获取到表单元素的值进行各种业务逻辑编写。另外一点我觉得比较重要的是,通过这种类似 submitAction 的方式,我们可以把很多业务逻辑抽离出组件,以实现 UI 与业务分离,从而带来代码可复用性以及可读性的提升。
这个新的 hook 是一个相对微小的优化,它带来一种更加轻量和简单的方式来获取其父表单元素 form 的状态,而不再需要通过传统的层层 prop 传递或者通过手动添加 context 的方式来实现。示例如下:
1
2
3
4
5
6
7
import { useFormStatus } from 'react-dom' ;function DesignButton ( const { pending, data } = useFormStatus (); return <button type ="submit" disabled ={pending} /> }
useOptimistic 这个新 hook 的能力与它的名称相对应,主要的作用是给开发者提供开箱即用的实现乐观更新的能力,即在一些异步处理的结果返回之前先将 UI 更新到预期状态,当异步结果返回后再做状态 merge,以提供给用户最即时的操作反馈。比如说在一些 ugc 内容发布的场景,如果完全等待接口返回之后再更新 UI,就很容易会让用户感知到操作不流畅甚至有卡顿感。以发表评论为例,来看如何使用该 hook。
1
2
3
4
5
6
7
8
9
10
11
12
13
14
15
16
17
18
19
20
21
22
23
24
25
26
27
28
29
30
31
32
33
34
35
36
37
38
39
40
41
42
43
44
45
import { useState, useOptimistic } from 'react' ;const Demo = function ( const [comments, setComments] = useOptimistic ([]); const [newComment, setNewComment] = useState ('' ); const [error, setError] = useState ('' ); const handleCommentSubmit = async ( setError ('' ); const optimisticNewComment = { id : Date .now (), text : newComment, status : 'sending' }; setComments ([...comments, optimisticNewComment]); try { const response = await api.postComment (postId, newComment); const updatedComments = comments.map (comment => comment.id === optimisticNewComment.id ? { ...comment, status : 'sent' } : comment ); setComments (updatedComments); } catch (error) { const filteredComments = comments.filter (comment =>id !== optimisticNewComment.id ); setComments (filteredComments); setError ('Failed to post comment. Please try again.' ); } }; return ( <div > <input type ="text" value ={newComment} onChange ={(e) => setNewComment(e.target.value)} placeholder="Write a comment..." /> <button onClick ={handleCommentSubmit} disabled ={!newComment.trim()} > Post Comment </button > {comments.map(comment => ( <div key ={comment.id} > {comment.text} {comment.status === 'sending' && <span > (Sending...)</span > } </div > ))} {error && <p style ={{ color: 'red ' }}> {error}</p > } </div > ); }
useOptimistic 除了接收一个初始化状态作为入参,还可以接收一个自定义函数作为第二个入参,该函数可以用来编写乐观状态的生成逻辑。比如:
1
2
3
4
const [state, setOptimisticState] = useOptimistic ([], (currentState, optimisticVal ) => { });
use 这个新增 api 的主要作用也是简化代码写法,它提供了简易的读取两类资源的值的方式,包括 context 和 promise。
以 context 为例,比如我有一个需要全局消费的主题色字段,为了避免 props 的层层传递,通常的实现手段是使用一个 context 进行全局透传, 传统的写法如下所示:
1
2
3
4
5
6
7
8
9
10
11
12
13
14
15
16
17
18
19
20
21
22
23
24
25
26
27
28
29
30
31
32
33
34
35
36
37
38
39
40
41
42
43
44
import { createContext, useContext } from 'react' ;const ThemeContext = createContext (null );export default function MyApp ( return ( <ThemeContext.Provider value ="dark" > <Form /> </ThemeContext.Provider > ) } function Form ( return ( <Panel title ="Welcome" > <Button show ={true} > Sign up</Button > <Button show ={false} > Log in</Button > </Panel > ); } function Panel ({ title, children } ) { const theme = useContext (ThemeContext ); const className = 'panel-' + theme; return ( <section className ={className} > <h1 > {title}</h1 > {children} </section > ) } function Button ({ show, children } ) { const theme = useContext (ThemeContext ); if (show) { const className = 'button-' + theme; return ( <button className ={className} > {children} </button > ); } return false }
通过 use api,也可以直接读取 context 的值,但 use 的一个优势是它不像传统的 React hook, 它可以放在条件语句中执行。其代码如下:
1
2
3
4
5
6
7
8
9
10
11
12
13
14
15
16
17
18
19
20
21
22
23
24
25
26
27
28
29
30
31
32
33
34
35
36
37
38
39
40
41
42
43
44
import { createContext, use } from 'react' ;const ThemeContext = createContext (null );export default function MyApp ( return ( <ThemeContext.Provider value ="dark" > <Form /> </ThemeContext.Provider > ) } function Form ( return ( <Panel title ="Welcome" > <Button show ={true} > Sign up</Button > <Button show ={false} > Log in</Button > </Panel > ); } function Panel ({ title, children } ) { const theme = use (ThemeContext ); const className = 'panel-' + theme; return ( <section className ={className} > <h1 > {title}</h1 > {children} </section > ) } function Button ({ show, children } ) { if (show) { const theme = use (ThemeContext ); const className = 'button-' + theme; return ( <button className ={className} > {children} </button > ); } return false }
对于 promise 的状态值读取也是异常简洁,如下所示:
1
2
3
4
5
6
7
8
9
10
11
12
13
14
15
16
17
import { use } from 'react' ;function App ( const fetchMessage = fetch ('https://getmessage' ).then ((res ) => res.json ()); return ( <Suspense fallback ={ <p > waiting for response</p > }> <Message fetchMessage ={fetchMessage} /> </Suspense > ) } function Message ({ fetchMessage } ) { const messageRes = use (fetchMessage); return <p > get message result: {messageRes}</p > }
上述示例中,通过 use 方法包裹了 fetchMessage 这个 promise,当该 promise resolve 时,use 方法可以直接读取到该值,同时 Message 组件也会替换外部 suspense 的 fallback。可以看出,use API 可以极大帮我们减少一些 promise 异步状态管理的模板代码。
针对 promise reject 的场景,使用 use API 有两种处理方式,如果你需要将错误信息展示给用户,可以结合使用 error-boundary 一起使用。示例如下:
1
2
3
4
5
6
7
8
9
10
11
12
13
14
15
16
17
18
import { use, Suspense } from "react" ;import { ErrorBoundary } from "react-error-boundary" ;export function MessageContainer ({ messagePromise } ) { return ( <ErrorBoundary fallback ={ <p > ⚠️Something went wrong</p > }> <Suspense fallback ={ <p > ⌛fetching message...</p > }> <Message messagePromise ={messagePromise} /> </Suspense > </ErrorBoundary > ); } function Message ({ messagePromise } ) { const content = use (messagePromise); return <p > Here is the message: {content}</p > }
另外一种处理方式是通过 promise 的 catch 方法将错误信息传递给 use api 读取,示例如下:
1
2
3
4
5
6
7
8
9
10
11
12
13
14
15
16
17
18
19
20
21
22
23
import { use, Suspense } from "react" ;export function MessageContainer ( const messagePromise = new Promise ((resolve, reject ) => { reject (); }).catch (() => { return "no new message found." ; }); return ( <Suspense fallback ={ <p > ⌛fetching message...</p > }> <Message messagePromise ={messagePromise} /> </Suspense > ); } function Message ({ messagePromise } ) { const content = use (messagePromise); return <p > Here is the message: {content}</p > }
use API 另一个比较隐性的好处,我觉得也是很好的一点,就是它可以让组件侧的代码更加简洁,更加有利于业务进行逻辑抽象。过往在使用 hook 的过程中,由于 hook 必须在组件内部使用且不能放在循环或条件语句中,导致很多业务逻辑必须写在组件内部,无法做到逻辑与 UI 分离。但是像 use 这种 api ,它提供了一种将逻辑外化的能力,比如说我可以将业务逻辑单独抽离成一个文件,与 UI 组件代码进行隔离,这就为更简洁的组件代码和更好的业务抽象提供了可能。
React Server Components 它是什么 React server component 是 React 新定义的一种组件类型,仅运行在 server 环境中,这个 server 并不是狭义的 node.js ssr server, 而是一个泛指,既可以指你本地启动的 server 环境,也可以是 ci/cd 的 server。
它不是一种新的渲染架构,独立于 SSR,可以跟 SSR 结合在一起使用,提供更好的页面体验。
它想解决什么问题 传统的 SSR 架构一直面临的一个问题是页面需要依赖大量的 js 资源的加载和执行才能进入可交互状态,大量的 js 会严重拖慢页面的加载性能和可交互性。为了解决这个问题,React 团队提出了 server component 的概念,其主要的卖点就是号称 zero-bundle-size, 通过 server component 渲染的 UI 不会打包生成 js bundle.
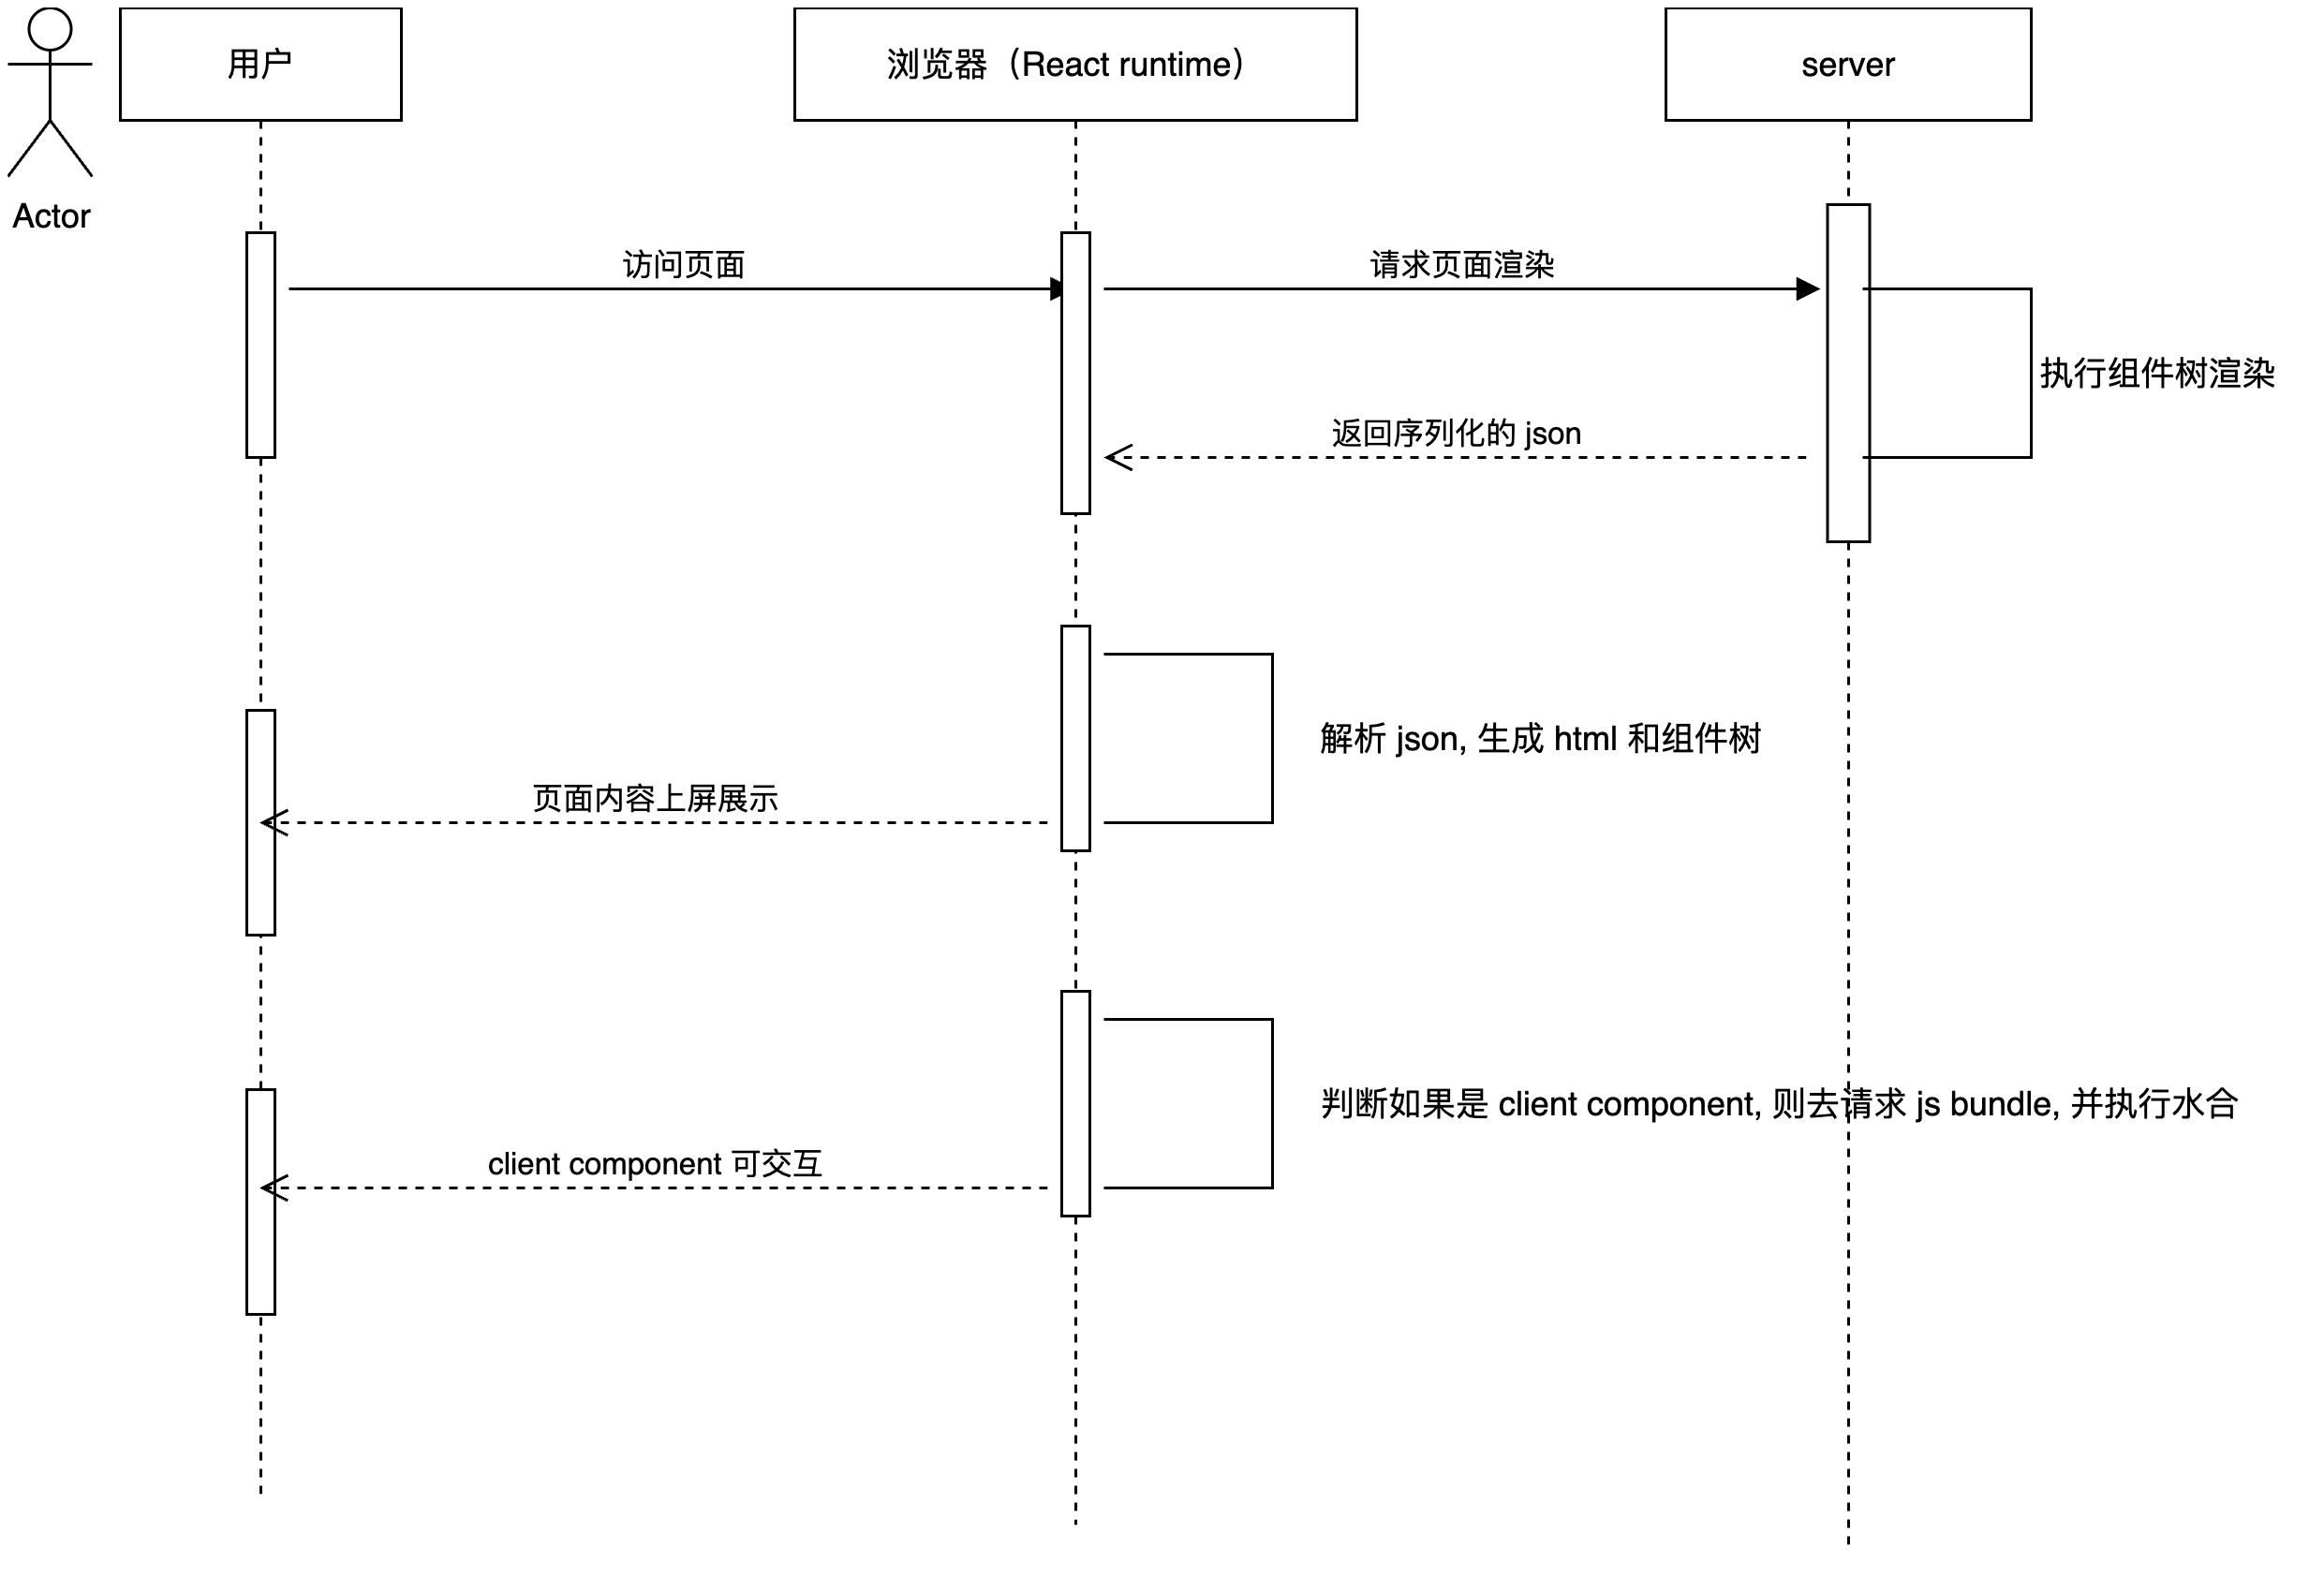
它的基本原理 可以用一张图来展示一下它的整体运行流程:
它与普通 SSR 不同的是,它在 server 上渲染生成的结果是一段序列化的 json 数据,然后通过 React runtime 来消费这些数据后生成真实 dom 结构。
在代码写法上,server component 与传统的 React 组件有所差别,它可以支持 async await, 如下所示:
1
2
3
4
5
6
7
8
9
10
11
12
13
import db from './database' ;async function UserInfo ({id} ) { const userInfo = await db.get (id); return ( <div > <div > {userInfo.name}</div > <div > {userInfo.avatar}</div > </div > ) }
在有了 server component 之后,未来传统的 React 组件必须要添加指令来单独声明和区分
1 2 3 4 5 6 7 8 9 10 11 12 13 14 15 16 17 18 19 20 'use client' import { useState, useEffect } from 'react' ;export function UserInfo ({id} ){ const [userInfo, setUserInfo] = useState ({}); useEffect (() => { fetch ('https://get-user-info' , id).then (res =>json ()).then ((res ) => { setUserInfo (res); }) }, []); return ( <div > <div > {userInfo.name}</div > <div > {userInfo.avatar}</div > </div > ) }
其局限性和负担
由于不能使用 useState 等状态管理 hook,它比较适用于无状态交互的组件,即静态展示类型的场景
在开发 server component 时需要注意不能使用不可被 json 序列化的数据格式。
给开发者带来了更高的心智负担,由于需要将 server component 的概念与以往的 React 组件概念进行区分,React 团队将传统的组件重新定义为 client component, 并需要在代码中进行手动声明。对于开发者来说,就需要更加关注不同的场景下使用不同类型的组件。
研发体验改进 React Compiler 过往我们对 React 组件进行性能优化的时候,为了避免组件发生没有必要的 re-render, 需要开发者手动通过 memo, useMemo, useCallback 等手段进行计算缓存,但这些 API 的使用在提升性能的同时也给开发者带来比较大的心智负担,对于初阶开发者来说尤为不友好。React 团队为了解决这个问题,在 React 19 中推出了 React compiler,与其他更新内容不同的是,React compiler 是一个代码编译阶段的工程化工具,具体来说就是一个 babel 插件 - babel-plugin-react-compiler,它会对你的源代码进行自动检测和优化,生成包含计算缓存能力的代码。以下面这个组件为例:
1
2
3
4
5
6
7
8
9
const Heading = ({ heading, totalProducts } ) => { return ( <nav > <h1 className ="text-2xl" > {heading}({totalProducts}) </h1 > </nav > ) }
这个组件可以缓存的数据有 3 个部分,分别是 heading, totalProducts 以及 jsx, 经过 React compiler 的编译,上述组件代码会被优化成如下形式:
1
2
3
4
5
6
7
8
9
10
11
12
13
14
15
16
17
18
19
20
21
22
23
function anonymous_1 (t0 ) { const $ = _c (3 ); const { heading, totalProducts } = t0; let t1; if ($[0 ] !== heading || $[1 ] !== totalProducts) { t1 = ( <nav > <h1 className ="text-2xl" > {heading}({totalProducts}) </h1 > </nav > ); $[0 ] = heading; $[1 ] = totalProducts; $[2 ] = t1; } else { t1 = $[2 ]; } return t1; }
可以看出,经过 React compiler 优化后的代码自动具备了 memo 的能力。但是需要注意的是由于其数据对比采用的是严格等于,我们在做数据变更的时候必须注意采用 immutable 的手法,否则可能会产生不符合预期的结果。如果对 React compiler 有更多兴趣,可以在 Compiler Playground 上做更多尝试。
Ref as a prop 在 React 19 中,forwardRef 终于迎来了终结,现在可以直接将 ref 作为 props 传递给子组件了。示例如下:
1
2
3
4
5
6
function MyInput ({placeholder, ref} ) { return <input placeholder ={placeholder} ref ={ref} /> } <MyInput ref={ref} />
Context as a provider React 19 也简化了 Context 的用法,不再需要手动声明 Context.Provider,示例如下:
1
2
3
4
5
6
7
8
9
10
11
import { createContext } from 'react' ;const ThemeContext = createContext ('' );function App ({children} ) { return ( <ThemeContext value ="dark" > {children} </ThemeContext > ); }
React 19 也增加了对 html head 相关元素的写法支持,现在你可以直接在组件代码内编写 title,meta,link等标签了,无需再通过 useEffect 的脚本动态插入标签来实现,示例如下:
1
2
3
4
5
6
7
8
9
10
11
12
13
14
function BlogPost ({post} ) { return ( <article > <h1 > {post.title}</h1 > <title > {post.title}</title > <meta name ="author" content ="Josh" /> <link rel ="author" href ="https://twitter.com/joshcstory/" /> <meta name ="keywords" content ={post.keywords} /> <p > Eee equals em-see-squared... </p > </article > ); }
React 会自行识别 title,meta,link 等标签,并将其提升至 html head 中。这种能力支持也会让我们的业务代码更加精简,并具备更好的可读性。但需要额外注意的是 link 以及 script 等标签。
当 link 标签被用于加载外部样式文件时,React 会默认按照组件渲染顺序来指定不同样式库的优先级,但是也可以通过指定特定属性 precedence 的值来确定优先级,当同时渲染的多个组件加载同一个样式资源时,React 会默认进行去重处理。示例如下:
1
2
3
4
5
6
7
8
9
10
11
12
13
14
15
16
17
18
19
20
21
22
23
24
25
26
27
28
29
function ComponentOne ( return ( <Suspense fallback ="loading..." > <link rel ="stylesheet" href ="foo" precedence ="default" /> <link rel ="stylesheet" href ="bar" precedence ="high" /> <article class ="foo-class bar-class" > {...} </article > </Suspense > ) } function ComponentTwo ( return ( <div > <p > {...}</p > <link rel ="stylesheet" href ="baz" precedence ="default" /> <-- 会被插入到 foo 与 bar 之间 --> </div > ) } function App() { return <> <ComponentOne /> // foo 与 bar 的 link 只会存在一份 <ComponentOne /> <ComponentTwo /> </> }
在 React 19 中,还可以在组件内部直接编写引入外部资源的 script 标签,React 也会自动进行 hoist 处理以及去重处理。如下所示:
1
2
3
4
5
6
7
8
9
10
11
12
13
14
15
16
17
18
function MyComponent ( return ( <div > <script async ={true} src ="..." /> Hello World </div > ) } function App ( <html> <body> <MyComponent> // script 仅会加载和执行一次 <MyComponent> </body> </html> }
React 19 对于 link 和 script 标签的这种支持除了可以简化我们的代码写法以外,更重要的是强化了资源按需加载的概念和能力,每个组件可以通过这种标签的方式来声明和使用其依赖的外部资源,而不再像以前那样,需要统一在页面维度加载一个全量的样式库或 js library。但是也会带来一些隐患,比如说如果多个组件分别引用了同一个样式库或 js library 的不同版本,那么可能就会导致页面中存在多个版本的资源,从而导致一些异常情况,因此也需要视具体场景来合理使用。
总结 React 19 中更新的诸多内容总体上主要还是在提升开发者体验方面,一系列新的 API 和新的 hook 都是想让开发者能够写更少的代码,做更多的事情,并试图通过编译器的方式来降低开发者的心智负担。但 React server component 的概念笔者始终觉得是给 React 架构带来了更多的复杂性和更高的心智负担,而且会造成应用链路过长,从而让整个页面变的更加脆弱,其带来的性能优化结果可能无法抵消其在其他方面带来的负担,未来很可能会是被诟病的一个败笔,